

Yoga Sequence for Your Digestion
January 14, 2020
Yoga Sequence for Your Digestion
Our digestive system works mainly to turn food into usable nutrients and to excrete waste products.
When our digestive health is not optimal, we get tired really easily, our skin breaks out with things like spots or splotches, we get bloated, gain weight, become malnourished; our immune systems can’t keep up with the ‘go go go’ lifemy we choose to live.
Yoga offers several postures that help cleanse, stimulate, aid, and encourage good digestive function. It’s best not to practice yoga right after a meal, but if you’re feeling any kind of bloating, gas, or indigestion a few hours after a meal or the morning after, here are some yoga postures to improve digestion.
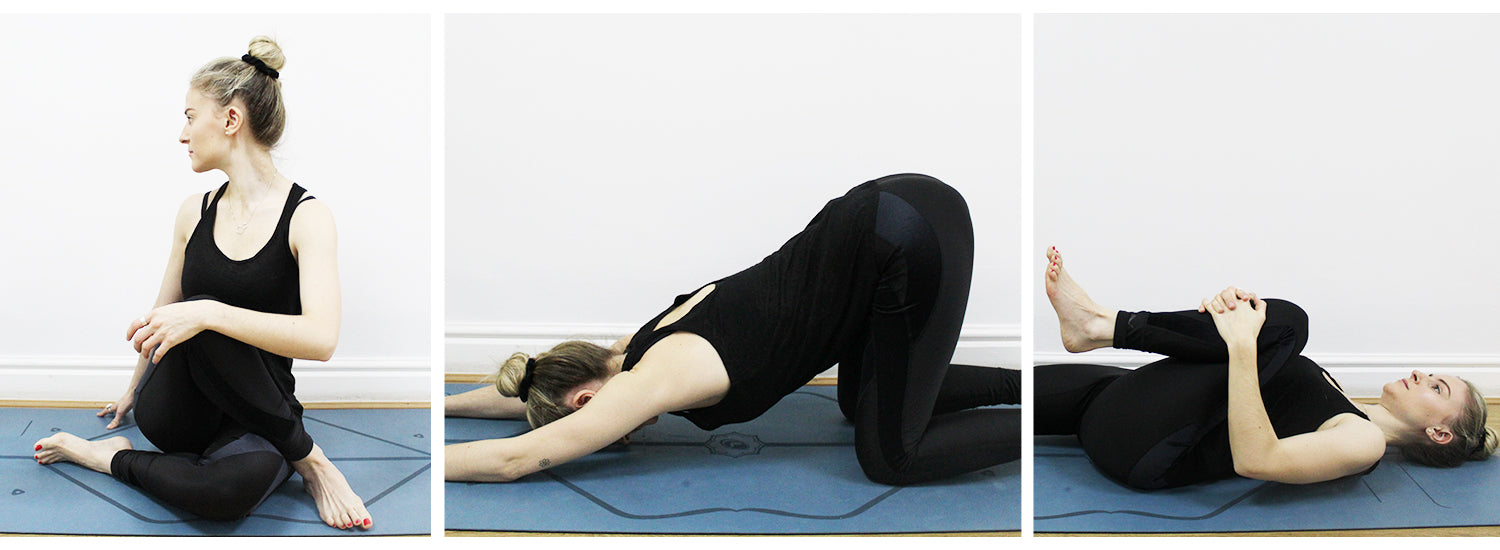
1. Half Lord of the Fishes Pose (Ardha Matsyendrasana)

Sit on the floor with your legs straight out in front of you. Bend your knees, put your feet on the floor, then slide your left foot under your right leg to the outside of your right hip. Lay the outside of the left leg on the floor. Step the right foot over the left leg and stand it on the floor outside your left hip. The right knee will point directly up at the ceiling.
Exhale and twist toward the inside of the right thigh. Press the right hand against the floor just behind your right buttock, and set your left upper arm on the outside of your right thigh near the knee. Pull your front torso and inner right thigh snugly together.
Press the inner right foot very actively into the floor, release the right groin, and lengthen the front torso. Lean the upper torso back slightly, against the shoulder blades, and continue to lengthen the tailbone into the floor.
2. Extended Puppy Pose (Uttana Shishosana)

Come to all fours (Tabletop position) with your shoulders stacked over your wrists, your hips stacked over your knees, and the tops of your feet relaxed down on the mat.
Slowly begin to walk your hands out in front of you, lowering your chest down toward the ground. Keep your hips over your knees and your arms shoulder-distance apart and gently release your forehead down to the ground.
Activate your arms by pressing into the palms of your hands and lifting your elbows and forearms away from the ground. Draw your shoulder blades onto your back and reach your hips up high toward the ceiling.
Invite your neck to relax and breathe into your back, lengthening your spine in both directions.
Remain in the pose anywhere from 5 to 10 breaths, then gently lift your forehead and walk your palms back toward your body to press up to Tabletop.
3. Wind Relieving Posture (Pavanamuktasana)

Lie on your back with your feet together and arms beside your body. Breathe in and as you exhale, bring your right knee in towards your chest and press the thigh on your abdomen with clasped hands.
Breathe in again and as you exhale, lift your head and chest off the floor and touch your chin to your right knee. Hold it there, as you take deep, long breaths in and out.
On an exhale, tighten the grip of your hands around your knee and increase the pressure against your chest. As you inhale, loosen your grip, come back to the ground and relax. Repeat this pose with the left leg and then with both the legs together.
To complete the pose, you may rock up and down or roll from side to side while clasping both knees to the chest, 3-5 times and then relax.
4. Supine Spinal Twist (Supta Matsyendrasana)

Lie down on your back. Bend your knees and put the soles of your feet on the floor with your knees pointing up toward the ceiling. Press into your feet to lift your hips slightly off the floor and shift them about an inch to your right. This is an important step because it sets your hips up to stack one on top of the other when you move into the twist.
Exhale and draw your right knee into your chest and extend your left leg flat on the floor. Keep your left foot actively flexed throughout the pose. Inhale. Exhale and cross your right knee over your midline to the floor on the left side of your body. Your right hip is now stacked on top of your left hip. You can hook your right foot behind your left knee if you like.
Open your right arm to the right, keeping it in line with your shoulders. Rest your left hand on your right knee or extend it to make a T shape with the arms. Turn your palms toward the ceiling. Turn your head to the right, bringing your gaze over your shoulder to your right fingertips. You can skip this step if it doesn't feel good on your neck. On your exhalations, release your left knee and your right shoulder toward the floor.
Hold the pose for five to 10 breaths. To come out of the pose, inhale and roll onto your back, drawing your right knee into your chest. Release both legs to the floor to neutralize your spine for several breaths before doing the other side.
5. Legs Up the Wall (Viparita Karani)

If you are practising the supported version, set a bolster or firm, long pillow on the floor against the wall. Begin the pose by sitting with your left side against the wall. Your lower back should rest against the bolster if you’re using one. Gently turn your body to the left and bring your legs up onto the wall. If you are using a bolster, shift your lower back onto the bolster before bringing your legs up the wall. Use your hands for balance as you shift your weight.
Lower your back to the floor and lie down. Rest your shoulders and head on the floor. Shift your weight from side-to-side and scoot your buttocks close to the wall. Let your arms rest open at your sides, palms facing up. If you’re using a bolster, your lower back should now be fully supported by it. Let the heads of your thigh bones (the part of the bone that connects in the hip socket) release and relax, dropping toward the back of your pelvis.
Close your eyes. Hold for 5-10 minutes, breathing with awareness. To release, slowly push yourself away from the wall and slide your legs down to the right side. Use your hands to help press yourself back up into a seated position.
6. Corpse Pose (Svasana)

Lying on your back, let the arms and legs drop open, with the arms about 45 degrees from the side of your body. Make sure you are warm and comfortable, if you need to place blankets under or over your body. Close the eyes, and take slow deep breaths through the nose. Allow your whole body to become soft and heavy, letting it relax into the floor. As the body relaxes, feel the whole body rising and falling with each breath.
Scan the body from the toes to the fingers to the crown of the head, looking for tension, tightness and contracted muscles. Consciously release and relax any areas that you find. If you need to, rock or wiggle parts of your body from side to side to encourage further release. Release all control of the breath, the mind, and the body. Let your body move deeper and deeper into a state of total relaxation.
Stay in Shavasana for 5 to 15 minutes. To release: slowly deepen the breath, wiggle the fingers and toes, reach the arms over your head and stretch the whole body, exhale bend the knees into the chest and roll over to one side coming into a fetal position. When you are ready, slowly inhale up to a seated position.
SIGN UP HERE to our Veganuary newsletter to keep updated with the latest blog posts, tips and tricks shared throughout January for all things Vegan!